OpenWhisk Programming Model
The OpenWhisk programming model...
Is Event-driven
In the OpenWhisk programming model, Events drive the
Serverless execution of functional code called Actions.
Events can come from any Event Source or Feed service
including:
- Datastores, Message Queues, Mobile and Web
Applications, Sensors, Chatbots, Scheduled tasks (via Alarms),
etc.
Supports any functional programming language
The OpenWhisk platform supports Action code written for any
of its ever-growing, built-in language runtimes.
The following is a list of runtimes the Apache OpenWhisk project
has officially released and made available on
our Downloads page.
- .Net - OpenWhisk runtime for .Net Core 2.2
- Go - OpenWhisk runtime for Go
- Java - OpenWhisk runtime for Java 8 (OpenJDK 8, JVM OpenJ9)
- JavaScript - OpenWhisk runtime for Node.js v10, v12 and v14
- PHP - OpenWhisk runtime for PHP 8.0, 7.4 and 7.3
- Python - OpenWhisk runtime for Python 2.7, 3 and a 3 runtime variant for AI/ML (including packages for Tensorflow and PyTorch)
- Ruby - OpenWhisk runtime for Ruby 2.5
- Swift - OpenWhisk runtime for Swift 3.1.1, 4.1 and 4.2
If you need languages or libraries the current
"out-of-the-box" runtimes do not support, you can create
and customize your own executable that run "black box"
Docker Actions
using the Docker SDK which are run on the
Docker Runtime.
Actions
This section will answer some of the essential questions about
OpenWhisk Actions relative to the programming model.
If you want more detailed information,
please read the project documentation on
OpenWhisk Actions.
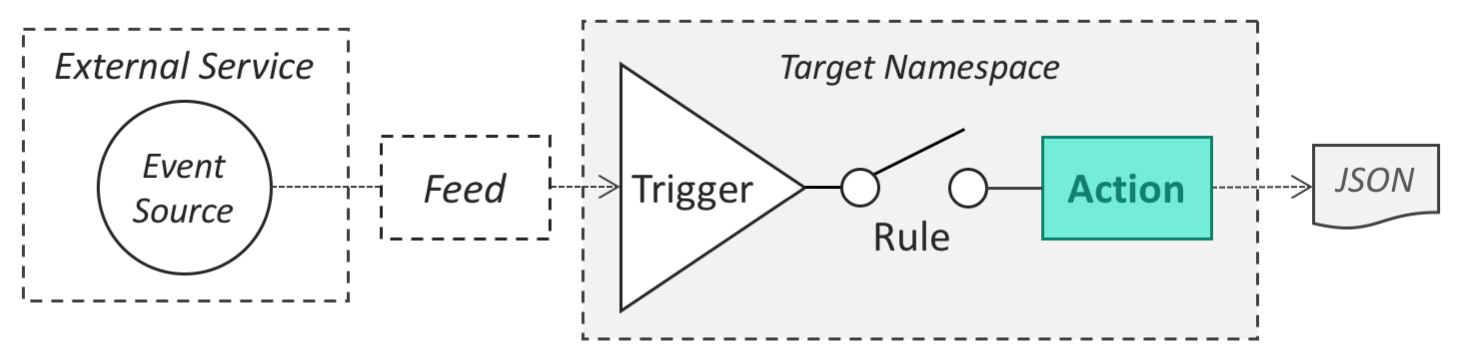
What is an Action?
Actions are stateless functions (code snippets) that run on
the OpenWhisk platform. Actions encapsulate application logic
to be executed in response to events. Actions can be invoked
manually by the OpenWhisk REST API, OpenWhisk CLI,
simple and user-created APIs or automated via Triggers
which we will discuss later.
Does the function's language matter?
No, OpenWhisk is agnostic to a function's implementation language.
This means that OpenWhisk operations used to create, invoke and
manage Actions are the same regardless of implementation choice.
You decide what languages are best for you!
What if your preferred language/runtime is not supported
by OpenWhisk?
If your favorite language is not listed above, you may find the
Docker action or native binary path more suitable.
The OpenWhisk platform is extensible and you can add new languages
or runtimes (with custom packages and third-party dependencies)
following the guide described
here.
Please reach out to other whiskers on dev mailing list at
dev@openwhisk.apache.org.
once you have followed the guide on creating a new language/runtimes.
Here are some examples of runtimes added by community:
Composing Sequences of Actions
Multiple actions, even implemented in different languages, may be
composed together to create a longer processing pipeline called a
sequence.
A sequence can be treated as a single action in terms of it's creation
and invocation.
Learn more
Listed below are some additional topics related to
developing OpenWhisk Actions:
- Namespacing
- the same Namespace and Naming rules as any
OpenWhisk Entity that are part of the
OpenWhisk programming model.
- System Limits
- Learn about some of the
(operator configurable) System Limits that are imposed on
OpenWhisk Actions.
- Web Actions
- Find out how to annotate OpenWhisk Actions to quickly enable
you to build web based applications.
- Action Processing
- Find out what happens "behind the scenes" when you invoke an
Action in Apache OpenWhisk.
Triggers and Rules
This section will describe how to automate OpenWhisk Actions
in response to events using OpenWhisk Triggers.
If you want to more detailed information,
please read the project documentation on
OpenWhisk Triggers and Rules.
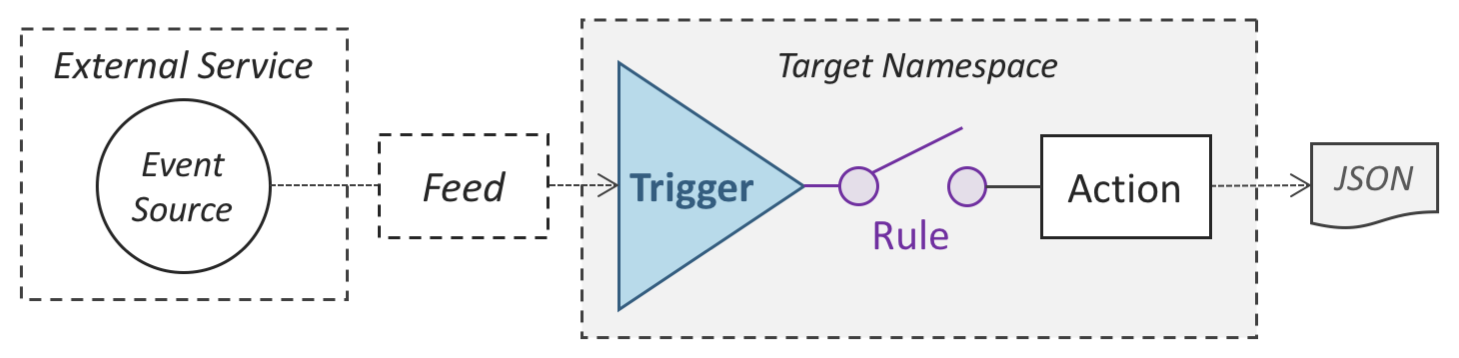
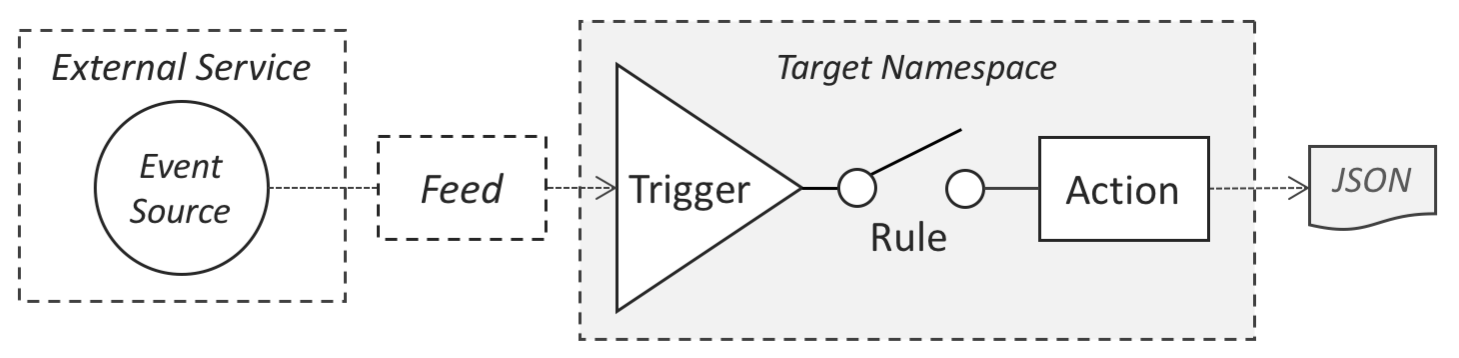
What is a trigger?
Triggers are named channels for classes or kinds of events
sent from Event Sources.
What is a Rule?
Rules are used to associate one trigger with one action.
After this kind of association is created, each time
a trigger event is fired, the action is invoked.
What are Event Sources?
These are services that generate events that often indicate
changes in data or carry data themselves. Some examples of
common Event Sources include:
- Messages arriving on Message Queues
- Changes in Databases
- Changes in Document Stores
- Website or Web Application interactions
- Service APIs being invoked
- IoT Frameworks forwarding device sensor data
- etc.
Why do I need to connect actions to event
sources?
OpenWhisk is based on an event-driven architecture where most
Actions are executed as events happen.
The Trigger itself is "fired" with a dictionary of
key-value pairs (i.e., the parameters) coming from the
Event Source and allows the configuration of optional default
values thus helping assure the data is compatible with any
associated Actions.
Rules allow for the same Trigger to be associated with multiple
Actions, as well as allow for specific automation to be enabled
or disabled dynamically without destroying the
Trigger definition.
